

看到大佬们部署长毛象,我就按耐不住了,其实我也想有一个属于自己的区中心化的社交平台....hmmm,但是长毛象太吃内存了,有没有更好的来源程序呢?于是就在github上找到了这款高颜值的,低占用的程序---misskey
程序介绍
Misskey 是一个诞生于地球的去中心化微博平台。 由于它存在于 Fediverse(一个组织各种社交媒体平台的宇宙)中,因此它与其他社交媒体平台相互关联。 您何不从城市的喧嚣中稍作休息,潜入一个新的互联网? 找个实例!---节选自github介绍
官方github https://github.com/misskey-dev/misskey
附界面图一张!

程序运行环境
- nodejs >=14
- Postgresql
- redis
- nginx(用于设置反代)
由于配置的要求较高,建议使用2h4g的服务器!
正式部署
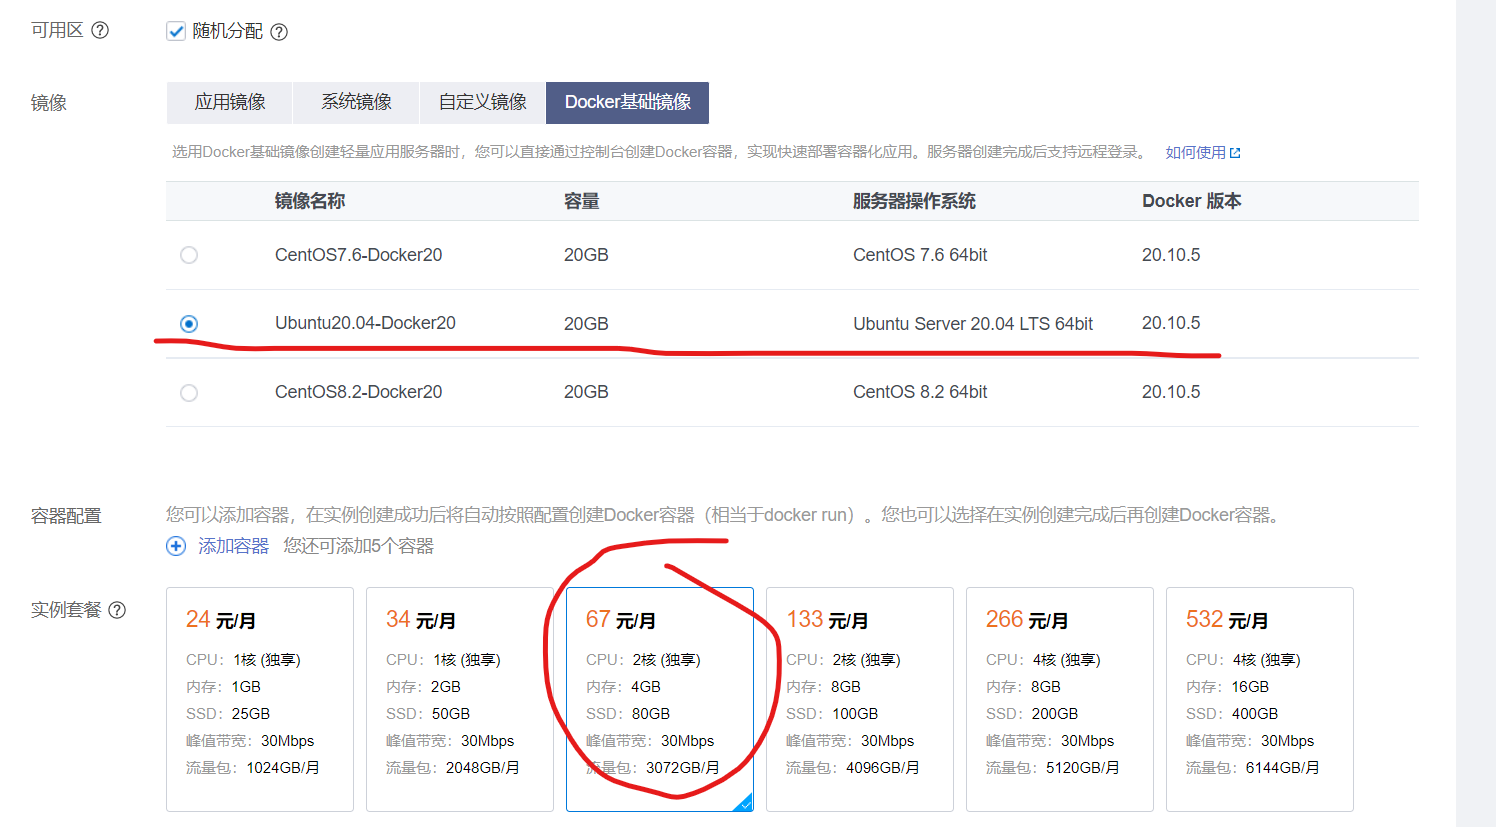
1.选购服务器,进行服务器基础配置
这里我选择的是腾讯云香港2h4g轻量应用服务器,AMD的U,yyds!(系统建议选ubuntu
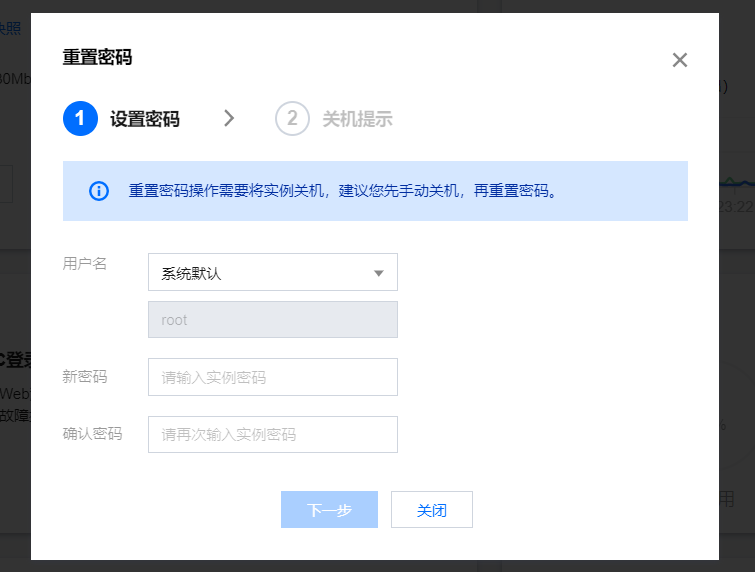
1.1创建成功后登录后台,重置密码
1.2打开防火墙安全组
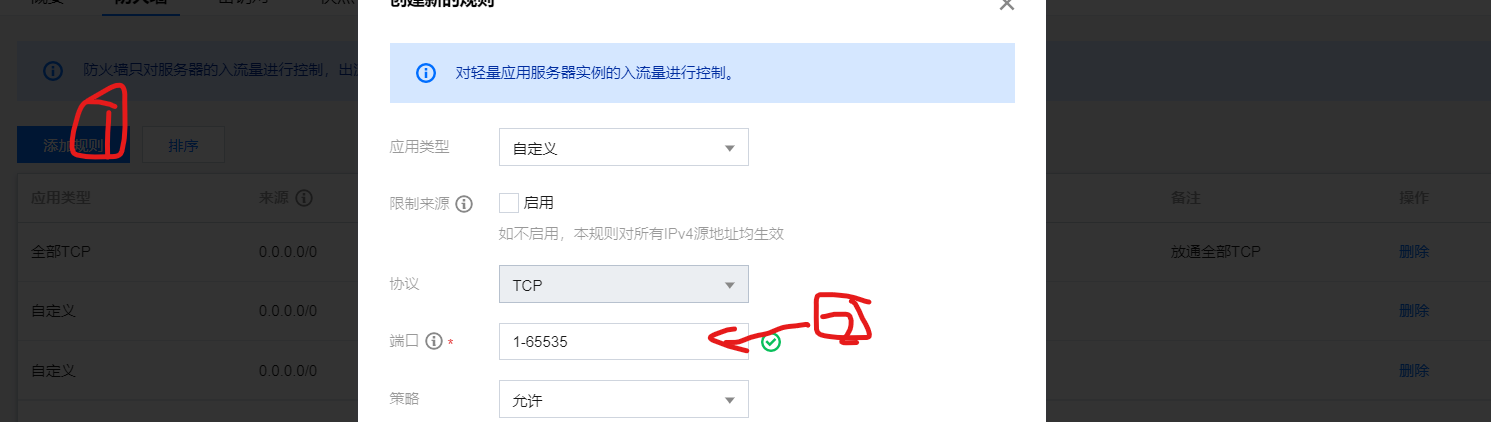
记得端口输入1-65535进行放行!
2.配置安装环境
现在我假设你已经安装链接好了ssh,现在我们开始部署misskey所需的环境
2.1安装nodejs15
#安装nodejs
curl -sL https://deb.nodesource.com/setup_15.x | bash -
apt-get install -y nodejs
node -v#查看node版本

安装yarn
npm install -g yarn
2.2安装Postgresql
#安装postgresql
sudo apt-get update
sudo apt-get install postgresql postgresql-client
配置postgesql数据库
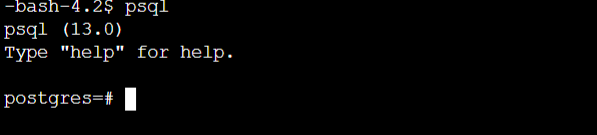
sudo -i -u postgres
psql#进入数据库命令
CREATE DATABASE misskey;#创建一个名为misskey的数据库
CREATE USER [your name] WITH PASSWORD '[your password]';#创建数据库
GRANT ALL PRIVILEGES ON DATABASE misskey TO [your name];#获取数据库管理权限
#创建完后
\q#退出SQL界面
2.3安装redis
2.3.1宝塔用户直接启用redis

2.3.2直接安装
apt install redis
2.3.3自己编译安装redis(麻烦
wget http://download.redis.io/releases/redis-6.2.5.tar.gz#从官网获取安装包
tar xzvf redis-6.2.5.tar.gz#解压
cd redis-6.2.5
make
cd src
make install PREFIX=/usr/local/redis#编译安装
redis-server /usr/local/redis/etc/redis.conf#开启redis
2.4安装nginx
2.4.1宝塔用户:我点一下安装就好

2.4.2直接apt安装(较为复杂
apt install nginx
2.4.3 lnmp安装包安装(推荐!管理方便
wget http://soft.vpser.net/lnmp/lnmp1.8.tar.gz -cO lnmp1.8.tar.gz && tar zxf lnmp1.8.tar.gz && cd lnmp1.8 && ./install.sh nginx
2.5 安装FFMpeg
apt isntall ffmpeg
3.正式安装misskey
3.1 github克隆
git clone https://github.com/misskey-dev/misskey.git
cd misskey
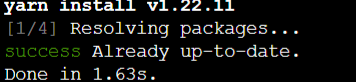
yarn #安装nodejs依赖
3.2配置安装文件
cp .config/example.yml .config/default.yml
nano .config/default.yml#编辑文件
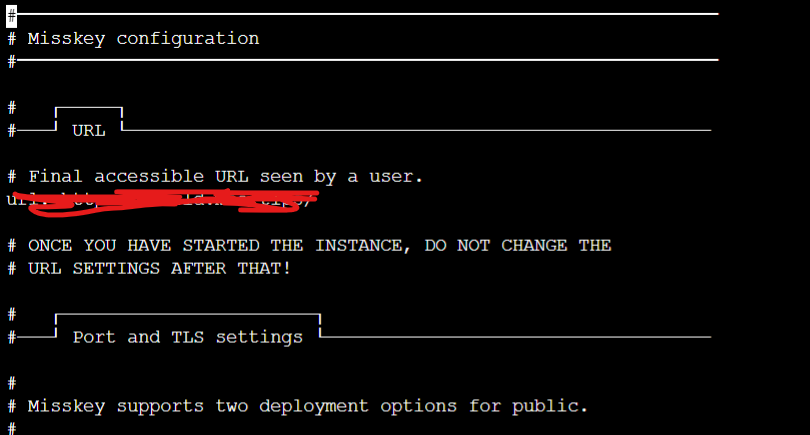
3.2.1配置详解
━━━━━━━━━━━━━━━━━━━━━━━━━━━━━━━━━━━━━━━━━━━━━━━━━━━━━━━━━━━━━━━
# Misskey configuration
#━━━━━━━━━━━━━━━━━━━━━━━━━━━━━━━━━━━━━━━━━━━━━━━━━━━━━━━━━━━━━━━

#   ┌─────┐
#───┘ URL └─────────────────────────────────────────────────────

# Final accessible URL seen by a user.
url: 你的网址

# ONCE YOU HAVE STARTED THE INSTANCE, DO NOT CHANGE THE
# URL SETTINGS AFTER THAT!

#   ┌───────────────────────┐
#───┘ Port and TLS settings └───────────────────────────────────

#
# Misskey supports two deployment options for public.
#

# Option 1: With Reverse Proxy
#
#                 +----- https://example.tld/ ------------+
#   +------+      |+-------------+      +----------------+|
#   | User | ---> || Proxy (443) | ---> | Misskey (3000) ||
#   +------+      |+-------------+      +----------------+|
#                 +---------------------------------------+
#
#   You need to setup reverse proxy. (eg. nginx)
#   You do not define 'https' section.

# Option 2: Standalone
#
#                 +- https://example.tld/ -+
#   +------+      |   +---------------+    |
#   | User | ---> |   | Misskey (443) |    |
#   +------+      |   +---------------+    |
#                 +------------------------+
#
#   You need to run Misskey as root.
#   You need to set Certificate in 'https' section.

# To use option 1, uncomment below line.
port: 3000    # misskey运行端口.

# To use option 2, uncomment below lines.
#port: 443

#https:
#  # path for certification
#  key: /etc/letsencrypt/live/example.tld/privkey.pem
#  cert: /etc/letsencrypt/live/example.tld/fullchain.pem

#   ┌──────────────────────────┐
#───┘ PostgreSQL configuration └────────────────────────────────

db:
  host: localhost
  port: 5432

  # Database name
  db: misskey

  # Auth
  user: 你的用户名
  pass: 你的密码

  # Whether disable Caching queries
  #disableCache: true

  # Extra Connection options
  #extra:
  #  ssl: true

#   ┌─────────────────────┐
#───┘ Redis configuration └─────────────────────────────────────

redis:
  host: localhost
  port: 6379
  #pass: example-pass
  #prefix: example-prefix
  #db: 1

#   ┌─────────────────────────────┐
#───┘ Elasticsearch configuration └─────────────────────────────

#elasticsearch:
#  host: localhost
#  port: 9200
#  ssl: false
#  user:
#  pass:

#   ┌───────────────┐
#───┘ ID generation └───────────────────────────────────────────

# You can select the ID generation method.
# You don't usually need to change this setting, but you can
# change it according to your preferences.

# Available methods:
# aid ... Short, Millisecond accuracy
# meid ... Similar to ObjectID, Millisecond accuracy
# ulid ... Millisecond accuracy
# objectid ... This is left for backward compatibility

# ONCE YOU HAVE STARTED THE INSTANCE, DO NOT CHANGE THE
# ID SETTINGS AFTER THAT!

id: 'aid'

#   ┌─────────────────────┐
#───┘ Other configuration └─────────────────────────────────────

# Whether disable HSTS
#disableHsts: true

# Number of worker processes
clusterLimit: 8

# Job concurrency per worker
# deliverJobConcurrency: 128
# inboxJobConcurrency: 16

# Job rate limiter
# deliverJobPerSec: 128
# inboxJobPerSec: 16

# Job attempts
# deliverJobMaxAttempts: 12
# inboxJobMaxAttempts: 8

# IP address family used for outgoing request (ipv4, ipv6 or dual)
#outgoingAddressFamily: ipv4

# Syslog option
#syslog:
#  host: localhost
#  port: 514

# Proxy for HTTP/HTTPS
#proxy: http://127.0.0.1:3128

#proxyBypassHosts: [
#  'example.com',
#  '192.0.2.8'
#]

# Proxy for SMTP/SMTPS
#proxySmtp: http://127.0.0.1:3128   # use HTTP/1.1 CONNECT
#proxySmtp: socks4://127.0.0.1:1080 # use SOCKS4
#proxySmtp: socks5://127.0.0.1:1080 # use SOCKS5

# Media Proxy
#mediaProxy: https://example.com/proxy

# Sign to ActivityPub GET request (default: false)
#signToActivityPubGet: true
3.3安装misskey
cd misskey
NODE_ENV=production yarn build
完成后就可以配置持久化了(这个时候你会发现ssh断掉就打不开了
3.4 配置为系统服务,方便启动
cd /etc/systemd/system
touch misskey.service#创建misskey.service文件
nano misskey.service
写入以下内容
[Unit]
Description=Misskey daemon
[Service]
Type=simple
User=misskey
ExecStart=/usr/bin/npm start
WorkingDirectory=/root/misskey
Environment="NODE_ENV=production"
TimeoutSec=60
StandardOutput=syslog
StandardError=syslog
SyslogIdentifier=misskey
Restart=always
[Install]
WantedBy=multi-user.target
然后使用
systemctl enable misskey
systemctl start misskey#启动misskey
4.配置反代
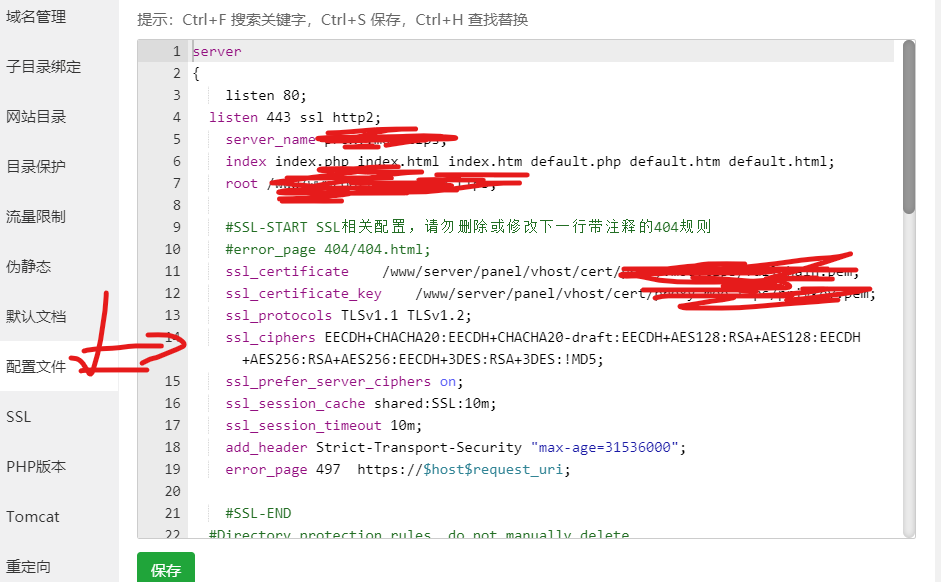
4.1宝塔用户专用nginx配置
map $http_upgrade $connection_upgrade {
    default upgrade;
    ''      close;
}

#proxy_cache_path /tmp/nginx_cache levels=1:2 keys_zone=cache1:16m max_size=1g inactive=720m use_temp_path=off;

server {
    listen 80;
       listen 443 ssl http2;
    listen [::]:443 ssl http2;
    server_name 你的域名;
    if ($server_port !~ 443){
        rewrite ^(/.*)$ https://$host$1 permanent;
        }
    ssl_certificate    /www/server/panel/vhost/cert/你的证书配置;
    ssl_certificate_key    /www/server/panel/vhost/cert/你的证书配置;
    ssl_protocols TLSv1.1 TLSv1.2 TLSv1.3;
    ssl_ciphers EECDH+CHACHA20:EECDH+CHACHA20-draft:EECDH+AES128:RSA+AES128:EECDH+AES256:RSA+AES256:EECDH+3DES:RSA+3DES:!MD5;
    ssl_prefer_server_ciphers on;
    ssl_session_cache shared:SSL:10m;
    ssl_session_timeout 10m;
    add_header Strict-Transport-Security "max-age=31536000";
    error_page 497  https://$host$request_uri;
    client_max_body_size 80m;

      # Proxy to Node
    location / {
        proxy_pass http://127.0.0.1:3000;
        proxy_set_header Host $host;
        proxy_http_version 1.1;
        proxy_redirect off;

        # If it's behind another reverse proxy or CDN, remove the following.
        proxy_set_header X-Real-IP $remote_addr;
        proxy_set_header X-Forwarded-For $proxy_add_x_forwarded_for;
        proxy_set_header X-Forwarded-Proto https;

        # For WebSocket
        proxy_set_header Upgrade $http_upgrade;
        proxy_set_header Connection $connection_upgrade;

        # Cache settings
        #proxy_cache cache1;
        #proxy_cache_lock on;
        #proxy_cache_use_stale updating;
        #add_header X-Cache
    #$upstream_cache_status;

        #超时设置
        proxy_connect_timeout 5400s;
            proxy_read_timeout 5400s;
            proxy_send_timeout 5400s;
            send_timeout 5400s;
    }
}
已经自带反代配置,不需要在加上!!!将反代改好后放在下图的配置文件里
反代配置来自 https://ovo.ci/2021/02/15/misskey-de-tu-cao-bu-shu-he-yun-ying感谢这位博主提供的解决方案!
# 4.2纯nginx反代配置
map $http_upgrade $connection_upgrade {
  default upgrade;
  ''      close;
}

server {
    listen       80;
    listen       443 ssl http2;
    server_name  你的域名;
    client_max_body_size 100m;
    client_body_buffer_size 2048k;
    if ($server_port !~ 443){
        rewrite ^(/.*)$ https://$host$1 permanent;
    }

    ssl_certificate    你的证书路径;
    ssl_certificate_key    你的私钥路径;
    ssl_protocols TLSv1 TLSv1.1 TLSv1.2;
    ssl_ciphers ECDHE-RSA-AES128-GCM-SHA256:HIGH:!aNULL:!MD5:!RC4:!DHE;
    ssl_prefer_server_ciphers on;
    ssl_session_cache shared:SSL:10m;
    ssl_session_timeout 10m;
    error_page 497  https://$host$request_uri;

location / {
    proxy_set_header Host $host;
    proxy_set_header X-Real-IP $remote_addr;
    proxy_set_header X-Forwarded-For $proxy_add_x_forwarded_for;
    proxy_set_header X-Forwarded-Proto https;
    proxy_set_header Proxy "";
    proxy_pass_header Server;

    proxy_pass http://127.0.0.1:3000;
    proxy_buffering off;
    proxy_redirect off;
    proxy_http_version 1.1;
    proxy_set_header Upgrade $http_upgrade;
    proxy_set_header Connection $connection_upgrade;

    tcp_nodelay on;
  }
}
写入到下/etc/nginx/conf.d/你的域名.conf
systemctl start nginx#重启nginx
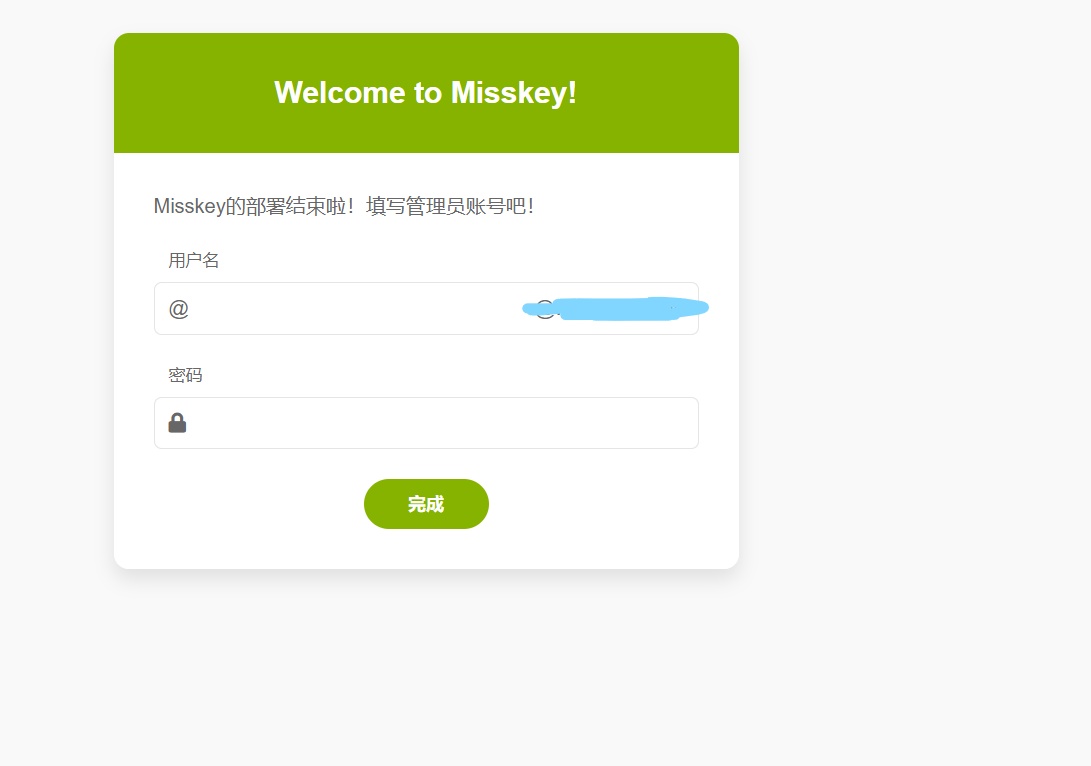
5.安装成功
访问你的域名就行啦!配置你的管理员账户趴!
注意
misskey使用ws进行通讯,你的CDN必须支持WS(websocket)!!!
我用的腾讯云CDN就支持WS哦!狗头
Comments | 9 条评论
你好,图片挂了
@咕尽 谢谢大佬提醒!
Misskey 很好的项目,可惜英文资料还是太少了,官方文档也写的不是很详细……
@IcedTangerine 确实,我部署的时候踩了好多坑。我接下来想试试docker部署,看看能不能好迁移一点。
安装yarn时总会Command failed with exit code 1怎么办
看来bug体质是避免不了的了TAT
@kazetori 这个原因有多方面啊。。。能把具体的报错打开让我看看嘛,或者我推荐你用docker部署,要是有时间的话麻烦给我个邮件,告诉我你的QQ我来帮你看看行嘛
@admin 啊啊啊…
搞定了,原来是因为node js版本有点低了
麻烦你了OWO
@Karitori 没事的
@kazetori 邮箱[email protected]